
MediaStorm Guide to the Slip Tool
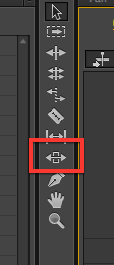
This article is part of a series of posts with tips and tricks from our producers' experience working with Adobe Premiere Pro CC after years of working in Final Cut Pro. To read more about why we made the switch, check out this post. One tool I often overlook when editing is the slip tool. My buddy Tim McLaughlin reintroduced me to its power last week. The slip tool allows you to change the in and out point of a single clip without affecting it’s duration or the duration of adjoining clips. Your project length stays the same. Activate the slip tool with either the shortcut key Y or by clicking on its icon in the toolbar. Next, hover over a video clip and you’ll see that your cursor change to the slip icon. Hold down your mouse and drag forward or backwards inside the clip, don't move the clip itself. You’ll…

![Read more about the article MediaStorm Guide to Importing Canon C300 Footage into Premiere Pro CC [Screencast]](https://www.mediastorm.com/blog/wp-content/uploads/2013/10/PosterFrame.jpg)