MediaStorm Guide to Selecting Clips in Premiere Pro Without a Mouse

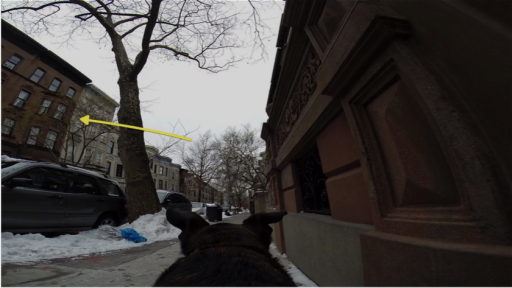
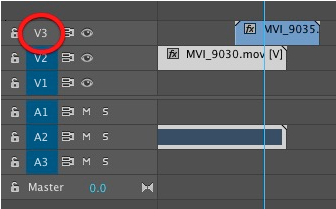
This article is part of a series of posts with tips and tricks from our producers' experience working with Adobe Premiere Pro CC after years of working in Final Cut Pro. To read more about why we made the switch, check out this post. Last week, a friend asked if there was a way in Premiere Pro to select more than one track at a time using only the keyboard. The answer is yes. The keyboard shortcut D will select all clips under the playhead, so long as the respective tracks are highlighted. In the example below, you’ll see that Video 3 is not highlighted, so when I press D, clips on that track are not selected. If you’d like the ability to toggle your audio and video tracks on and off without using the mouse, you can create a custom keyboard shortcut key for each. Open the Keyboard Shortcut window (Option-Command-K)…

Continue ReadingMediaStorm Guide to Selecting Clips in Premiere Pro Without a Mouse

MediaStorm Guide to Adjusting Output Volume in Premiere Pro

This article is part of a series of posts with tips and tricks from our producers’ experience working with Adobe Premiere Pro CC after years of working in Final Cut Pro. To read more about why we made the switch, check out this post.


Let’s say you’ve mixed your audio and for whatever reason it’s consistently a little too low or a bit hot. Sure, you could return to your timeline and remix again, but that’s time consuming.

Premiere Pro 2014 offers a quick and elegant solution.

First, open the Audio Track Mixer. (Note that this is different from the Audio Clip Mixer.)

Open the disclosure triangle on the top left side.


(more…)

Continue ReadingMediaStorm Guide to Adjusting Output Volume in Premiere Pro

MediaStorm Guide to Automatic File Renaming with Mac Yosemite (10.10)

This article is part of a series of posts with tips and tricks from our producers’ experience working with Adobe Premiere Pro CC after years of working in Final Cut Pro. To read more about why we made the switch, check out this post.


The new free release of the Mac operating system, Yosemite (10.10) offers an easy way to automate file renaming straight from the Finder.

Previously, you needed to write an Automator script or purchase an additional application.

To begin, simply right-click the Finder files you’d like to rename and then select Rename [x] Items… from the contextual menu. X represents the number of files you have selected.

(more…)

Continue ReadingMediaStorm Guide to Automatic File Renaming with Mac Yosemite (10.10)

MediaStorm Guide to Premiere Pro Search Bins

This article is part of a series of posts with tips and tricks from our producers’ experience working with Adobe Premiere Pro CC after years of working in Final Cut Pro. To read more about why we made the switch, check out this post.


A great new feature in the most recent update to Premiere Pro (2014.1) is the ability to create search bins.

Search bins act like smart folders, allowing you to filter your assets for specific criterion. This is enormously helpful for locating similar items that are otherwise scattered across your project.

There are three ways to create a smart bin:

  • Click the search bin icon at the top of a Project Window

  • Right-Click in the Project window and select New Search Bin…
  • Select the menu File > Search Bin

You will then be presented with the Edit Search Bin window where you can enter your search criterion.
(more…)

Continue ReadingMediaStorm Guide to Premiere Pro Search Bins

MediaStorm Guide to Fixing GoPro Lens Distortion in Premiere Pro 2014

This article is part of a series of posts with tips and tricks from our producers’ experience working with Adobe Premiere Pro CC after years of working in Final Cut Pro. To read more about why we made the switch, check out this post.


Premiere Pro 2014 offers a great new feature for correcting the lens distortion of GoPro cameras.

Last winter, I strapped a GoPro onto my dog, Emmy, and went for a walk. You can clearly see the fisheye distortion in the screenshot below. In particular, notice the curvature of the building on the left.

In Premiere Pro’s Effects pane, twirl down Presets > Lens Distortion Removal > GoPro and find your camera model as well as the setting used when your footage was shot.

(more…)

Continue ReadingMediaStorm Guide to Fixing GoPro Lens Distortion in Premiere Pro 2014