MediaStorm Guide to the Warp Stabilizer Effect in Adobe Premiere Pro
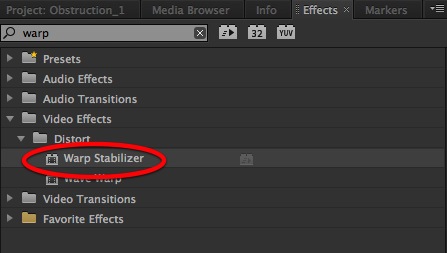
This article is part of a new series of posts with tips and tricks from our producers' experience working with Adobe Premiere Pro after years of working in Final Cut Pro. To read more about why we made the switch, check out this post. Today's post was written by MediaStorm producer Eric Maierson. If Adobe Premiere Pro has a secret weapon, then surely it’s the Warp Stabilizer effect. The Warp Stabilizer transforms shaky footage into usable material. The results are often remarkable. To apply the Warp Stabilizer, simply search for “warp” in the effects window (Shift-7). Then drag the effect onto the timeline clip that you’d like to stabilize. Note that the Warp Stabilizer effect does not work on footage that has been slowed down or sped up. The first thing you’ll notice is a blue bar across your clip. Adobe Premiere Pro is analyzing your material to understand its movement. Depending…