Reader Feedback: MediaStorm Guide to Downloading from YouTube and Vimeo

I received some important feedback regarding my post from several weeks ago, MediaStorm Guide to Downloading from YouTube and Vimeo. “JY” writes, “KeepVid actually doesn’t work great on Mavericks because it has Java disabled/uninstalled.” This is true. Because Java has been used to launch attacks on Macs in the past, Apple decide to not pre-install it on OS X 10.9 (Mavericks). You can still download the software but for security reasons you may choose not to. Fortunately, when it comes to downloading videos, there are a plethora of alternatives to keepvid.com. We received recommendations for the free ClipConverter as well as MacX YouTube Downloader. A tutorial for the latter can be found here. My good pal Leandro Badalotti suggests the Torch Browser, which allows for downloads from more sites than just YouTube. Let us know what alternatives you’ve found in the comments below and thanks, as always, for the feedback.

Continue ReadingReader Feedback: MediaStorm Guide to Downloading from YouTube and Vimeo

MediaStorm Guide to Downloading from YouTube and Vimeo

Last week I started a project that incorporates previously produced material. The client stores this footage on YouTube and Vimeo. Once I’ve selected the clips I’d like to use, they will send me the Final Cut Projects and raw assets so I can use their material accordingly.

But it takes time to procure these files and as always, the clock is ticking. You’ve probably been in this situation yourself.

Rather than screen-capture the files with QuickTime or iShowU, my workaround is to download directly from the aforementioned sites. This is far faster as I don’t need to rerecord in real time.

I use the free service keepvid.com which allows the user to download videos directly from sites like YouTube and Vimeo. This works via a bookmarklet—a few lines of javascript—that sit on your browser’s bookmark bar.

To begin, load keepvid.com in your browser. 
(more…)

Continue ReadingMediaStorm Guide to Downloading from YouTube and Vimeo

MediaStorm Guide to the Slip Tool

This article is part of a series of posts with tips and tricks from our producers' experience working with Adobe Premiere Pro CC after years of working in Final Cut Pro. To read more about why we made the switch, check out this post. One tool I often overlook when editing is the slip tool. My buddy Tim McLaughlin reintroduced me to its power last week. The slip tool allows you to change the in and out point of a single clip without affecting it’s duration or the duration of adjoining clips. Your project length stays the same. Activate the slip tool with either the shortcut key Y or by clicking on its icon in the toolbar. Next, hover over a video clip and you’ll see that your cursor change to the slip icon. Hold down your mouse and drag forward or backwards inside the clip, don't move the clip itself. You’ll…

Continue ReadingMediaStorm Guide to the Slip Tool

MediaStorm Guide to Creating Multi-Camera Sequences in Premiere Pro, Part 2

This article is part of a series of posts with tips and tricks from our producers’ experience working with Adobe Premiere Pro CC after years of working in Final Cut Pro. To read more about why we made the switch, check out this post.


In the first part of this tutorial, I showed you how to sync multiple camera angles and audio sources using Red Giant’s $199 PluralEye’s 3.0. After you’ve imported the XML file generated by PluralEyes into Premiere Pro CC and your tracks are in sync, it’s time to create a multi-camera sequence.

First though, because PluralEyes offers no audio configuration options like stereo vs.mono, or which tracks to duplicate for stereo pairs, you’ll need to make sure your audio is set up properly. See the screencast MediaStorm Guide to Audio Configuration for assistance.

As a general rule, I use the better audio source and double it so I now have a stereo pair.

MULTI-CAMERA SEQUENCE

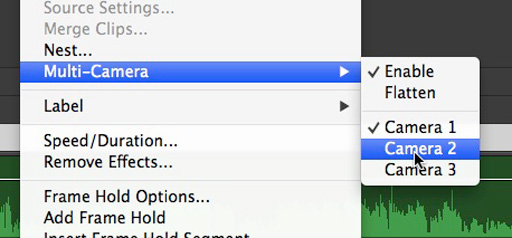
A multi-camera sequence appears in your timeline as one clip, but bundles multiple camera angles together so that you can easily see all available options as you edit.

To create a multi-camera sequence, first create a new empty sequence (Command-N). Next, drag your synced sequence from the Project window into this one. Putting one sequence inside another is referred to as a nested sequence.

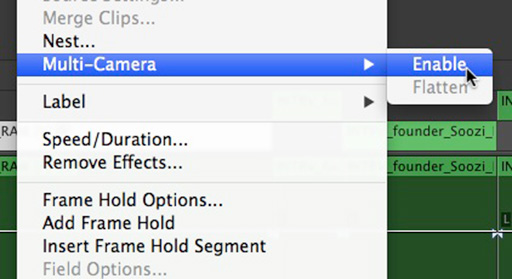
Rename your new sequence ProjectName_InterviewName_multiclip_RAW. Still in the timeline, right-click your sequence and select Multi-Camera > Enable.

(more…)

Continue ReadingMediaStorm Guide to Creating Multi-Camera Sequences in Premiere Pro, Part 2