MediaStorm Guide to Fixing GoPro Lens Distortion in Premiere Pro 2014

This article is part of a series of posts with tips and tricks from our producers’ experience working with Adobe Premiere Pro CC after years of working in Final Cut Pro. To read more about why we made the switch, check out this post.


Premiere Pro 2014 offers a great new feature for correcting the lens distortion of GoPro cameras.

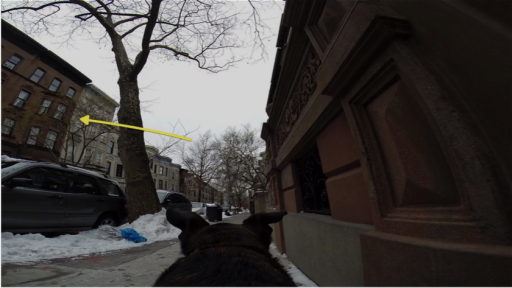
Last winter, I strapped a GoPro onto my dog, Emmy, and went for a walk. You can clearly see the fisheye distortion in the screenshot below. In particular, notice the curvature of the building on the left.

In Premiere Pro’s Effects pane, twirl down Presets > Lens Distortion Removal > GoPro and find your camera model as well as the setting used when your footage was shot.

(more…)

Continue ReadingMediaStorm Guide to Fixing GoPro Lens Distortion in Premiere Pro 2014

MediaStorm Guide to Exporting from the Premiere Pro Project Window

This article is part of a series of posts with tips and tricks from our producers’ experience working with Adobe Premiere Pro CC after years of working in Final Cut Pro. To read more about why we made the switch, check out this post.


In earlier versions of Premiere Pro, it was necessary to put media onto a timeline before exporting.

The latest update to the program, Premiere Pro 2014, changes this, making it easy to export any asset or even an entire sequence straight from the Project window.

Here’s how:

In the Project window, simply select a clip or sequence. Then, right-click and choose Export Media… at the bottom of the menu.


(more…)

Continue ReadingMediaStorm Guide to Exporting from the Premiere Pro Project Window

A Complete List of MediaStorm Guides to Premiere Pro

Below is an up-to-date list (August 2014) of all our Adobe Premiere Pro Guides. Of course, there are other non-editing guides available that can be found by searching the blog. But if you’re using Premiere Pro this list will hopefully serve you well. Happy editing. Audio MediaStorm Guide to Recording Voice-Over in Premiere Pro 2014 MediaStorm Guide to Adding Quick Audio Dissolves in Premiere Pro 2014 MediaStorm Guide to Adjusting Output Volume in Premiere Pro MediaStorm Guide to Adjusting Output Volume in Premiere Pro MediaStorm Guide to Adding EQ Presence MediaStorm Guide to Audio Configuration in Premiere Pro CC MediaStorm Guide to Fixing Missing Waveforms Backup MediaStorm Guide to Auto Saving Premiere Backups to the Cloud MediaStorm Guide to Enhancing Adobe Premiere Pro's Auto-Save Functionality Editing MediaStorm Guide to Selecting Clips in Premiere Pro Without a Mouse MediaStorm Guide to Copy and Pasting a Clip Range in Premiere Pro MediaStorm Guide to Dynamic…

Continue ReadingA Complete List of MediaStorm Guides to Premiere Pro

MediaStorm Guide to Nudging Audio in Premiere Pro 2014

This article is part of a series of posts with tips and tricks from our producers' experience working with Adobe Premiere Pro CC after years of working in Final Cut Pro. To read more about why we made the switch, check out this post. A quick way to change your audio levels in Premiere Pro is to select a clip in the timeline and use the closed bracket ( ] ) to raise the volume or the open bracket ( [ ) to lower it. You can easily alter a group of clips this way by simply lassoing them first. Unfortunately, this method does not work in Premiere Pro CC if any of the audio contained key frames. This was a real limitation. Thankfully, with the introduction of Premiere Pro 2014, you can now nudge key-framed audio with a user-defined shortcut key. From the Premiere Pro menu select Keyboard Shortcuts… (Option-Command-K) Search…

Continue ReadingMediaStorm Guide to Nudging Audio in Premiere Pro 2014