
This article is part of a series of posts with tips and tricks from our producers’ experience working with Adobe Premiere Pro CC after years of working in Final Cut Pro. To read more about why we made the switch, check out this post.
Adobe Premiere Pro CC 2014 offers two ways to quickly scale a large image to the size of your sequence.
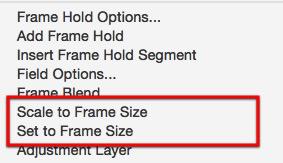
To begin, add your image to the timeline, then right-click it.
You’ll see two options: Scale to Frame Size and Set to Frame Size.

While both options will resize your image, each does so in a slightly different manner.
Scale to Frame Size changes the image Scale setting to 100%, effectively throwing out any addition resolution. If you need to further increase your image you will have to up-res it.
Using Set to Frame Size will also scale your image to the sequence frame size but it does so by simply increasing or decreasing the size until it fits. No resolution is lost in the process.
For my money, Set to Frame Size is the better option.