MediaStorm Guide to Quickly Deleting Clips in Premiere Pro

This article is part of a new series of posts with tips and tricks from our producers' experience working with Adobe Premiere Pro after years of working in Final Cut Pro. To read more about why we made the switch, check out this post. Today's post was written by MediaStorm producer Eric Maierson. File this tip under I-should-have-thought-of-this-years-ago. First, some backstory from the MediaStorm Post-production Workflow. At MediaStorm, when we log b-roll we use two specific suffixes to identify our sequences. The first is RAW, which indicates that a timeline contains all the clips from a scene or day of shooting. So if a Finder folder contains clips from day one of shooting at a barn, the Adobe Premiere Pro sequence containing those files will be labeled Barn_01_RAW. We then log these clips, raising selects up one video channel as seen below. Next, we duplicate the sequence and replace the word RAW…

Continue ReadingMediaStorm Guide to Quickly Deleting Clips in Premiere Pro

MediaStorm Guide to Nudging in Premiere Pro CC

This article is part of a new series of posts with tips and tricks from our producers' experience working with Adobe Production Pro after years of working in Final Cut Pro. To read more about why we made the switch, check out this post. Today's post was written by MediaStorm producer Eric Maierson. A great new feature in Adobe Premiere Pro CC is the ability to nudge clips up and down tracks using only the keyboard. To set a shortcut, simply open the Premiere Pro > Keyboard Shortcuts… menu. Then, search for “clip.” You’ll want to add shortcuts for Nudge Clip Selection Up and Nudge Clip Selection Down. We use Command-Up Arrow and Command-Down Arrow, respectively since they are similar to the default shortcuts for nudging clips left (Command-Left Arrow) and right (Command-Left Arrow). To nudge your clip, simply select it on the timeline and press the respective keyboard shortcut. Note that…

Continue ReadingMediaStorm Guide to Nudging in Premiere Pro CC

This is what editing feels like.

You are alone in a dark room. Across the floor are the scattered pieces of three or four or five floor lamps. You don’t know how many. There are screws and bulbs and fixtures mixed together. You try not to panic as you feel your way across the floor in search of these pieces. It does not matter how many times you’ve done this exercise before. Each time you do it, it feels like the first. People tell you, you’ve done it before, you can do it again. But they don’t know what it feels like to be in the dark room searching blindly. Your work is meticulous. You must evaluate not only each piece, trying to discern its nature, but also how it relates to all of the other pieces. Most of the time, you feel as if your work is wrong. It’s a persistent feeling, that the path you’ve chosen,…

Continue ReadingThis is what editing feels like.

MediaStorm Guide to Through Edits in Premiere Pro CC

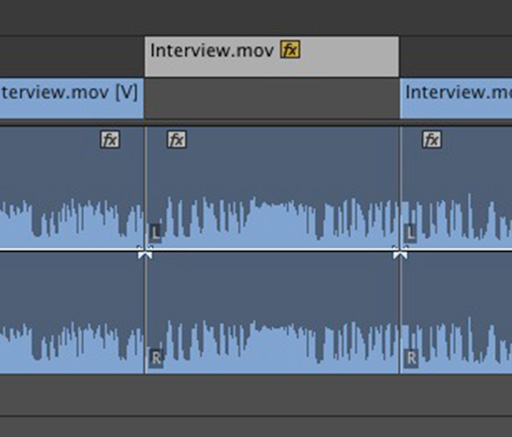
This article is part of a new series of posts with tips and tricks from our producers' experience working with Adobe Production Pro after years of working in Final Cut Pro. To read more about why we made the switch, check out this post. Today's post was written by MediaStorm producer Eric Maierson. Premiere Pro CC, Adobe’s followup to CS6, is stuffed with all kinds of great new features. One of the most useful additions is the ability to see through edits, a feature available in Final Cut Pro 7 but curiously absent from the previous Premiere Pro iteration. A through edit is a marker that indicates where you’ve made an edit but no frames have actually been omitted. To turn on this functionality, from the Sequence menu select Show Through Edits. Now, when you first make an edit, you’ll see the through edit icon. Adobe has conveniently used the same icon…

Continue ReadingMediaStorm Guide to Through Edits in Premiere Pro CC

MediaStorm’s 10 More Ways to Improve Your Multimedia Right Now

As a followup to a previous post, here are ten more ways to improve your work right now, no matter how challenging your original assets may be. Make edits with purpose. Always ask why you are making an edit at a particular place. Is the cut motivated by action? A musical beat? A pause in narration? If you don't have a reason, you need to find a new location for your edit. Every edit must be motivated. When editing your visuals, don't cut in the middle of a word. Doing so is confusing. Edit between words, or even better, edit according to written grammar: at a comma, a period, or to emphasize a word. Cutting after words like because and however is also effective. Edit rhythmically. Make the first cut at the beginning of a spoken phrase. Time the first phrase so it ends right before a musical beat. Cut to another…

Continue ReadingMediaStorm’s 10 More Ways to Improve Your Multimedia Right Now