
This is the first of a new series of posts with tips and tricks from our producers’ experience working with Adobe Premiere Pro after years of working in Final Cut Pro. To read more about why we made the switch, check out this post.
Today’s post is the first of two posts on navigating the <Adobe Premiere Pro timeline, written by MediaStorm producer Eric Maierson.
Most of your time editing is spent in the timeline. Mastering just a few shortcut keys will enable you to work faster and focus instead on creating meaningful stories.
Here are some of the shortcuts that I use most regularly.
Transport Controls
J – plays timeline forward
K – stops playback
L – plays timeline forward
Spacebar – toggles between stopping and starting playback
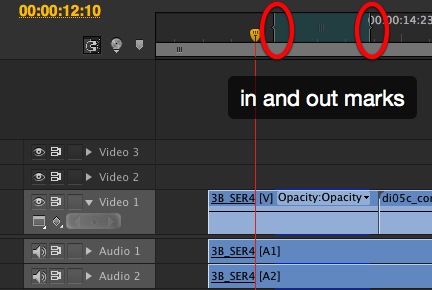
In and Out Points
Use the familiar I and O key to create in or out points.
Option-X will remove in and out points.

Viewing the Timeline
/ – shows the entire timeline \ – shows the entire timeline (similar to FCP’s Shift-Z). Pressing it a second time will return you to your original, closer view.
+ and – keys – zoom the timeline in and out, respectively. Use the + and – from the main keyboard. The numeric keypad equivalents are associated with other shortcuts.
Select All
To select everything on your timeline use Command-A. To deselect, use Command-Shift-A.
Snapping
The S key turns snapping on and off. Check the magnet icon on the right of the timeline to see if it’s on. If snapping is on, the magnet will display a bounding box.

If you are in the act of dragging a selection, holding down the S will temporarily turn snapping on/off. When you let go of the S key, snapping will revert to its original mode.
Track Selection Tools
Perhaps the most challenging shortcut to remember is the selection tool. Adobe uses V, not FCP’s–and the more Mac-like–A key.
Use the V key to lasso clips on the timeline.
To select an entire track, use the A key then select a clip. All clips forward on that track, will be selected.
If your audio is linked to a video track, using the single track selection tool with select both.
(To unlink tracks, right-click either the audio or video and select Unlink. A forthcoming tutorial will show how to set up a custom keyboard shortcut.)
To select all tracks forward, use Shift-A. You’ll see two arrows.
Unfortunately, this does not lock your selection. If you take your hand off the Shift key, the selection resorts to just one track (or linked tracks). One way around this is to select all tracks using Shift-A then immediately press the selection tool (V). Your selection will then remain.
Arrow Keys
The Forward and Back Arrow keys move your playhead one frame forward or back, respectively. Shift-Forward or Shift-Back will move your playhead five frames forward or back.
As with FCP 7, the Up and Down Arrows move your playhead forward and back to the next edit. There are a couple of differences, however. The most obvious is that Premiere Pro will only jump to highlighted tracks.

In the example above, note that video tracks 2 and 3 are not selected. Pressing the Up Arrow (jump to previous edit) will skip the video on track 3 and jump straight to the end of the first clip on track 1.
Unlike FCP, Premiere Pro does not count an in or out marker as an edit (unless they happen to align with an actual clip).
To jump to in and out points you’ll need to use Shift-I and Shift-O, accordingly.
Moving Clips with the Keypad
To move clips using the keypad, first laso them with either the Selection Tool (V) or use the Track Selection Tool (T).
Make sure your clips(s) have room to move, that they’re not butt against a clip that is unselected.
Next, press the numeric keypad’s + or – key depending on which way you want to move in the timeline. Then, enter the amount you’d like to move.
You’ll see your numbers appear on the right side of the timeline.

Premiere Pro handles time code in this regard the same way as Final Cut. There’s no need to enter the entire time code.
+5 will move your selection 5 frames.
+1.05 will move your selection one second and five frames.
If you do not have clips selected, using this technique will just move your playhead.
Deleting Clips
There are two ways to delete clips depending on how they are selected.
If you have selected your clip with the Selection Tool (V)—it will be a darker color—use the Delete key to lift delete. Doing this will leave a gap in your timeline. The length of your sequence remains the same.
To ripple delete a selected clip, use Option-Delete. Your timeline will collapse to absorb the space where the clip once resided. The length of your sequence will shorten.
If you’ve made a selection using an in (I) and out (O) mark, use the Semi-colon key to lift delete and the Single Quote key (‘) to ripple delete.
To learn more about how our producers are using Adobe Premiere Pro see our other blog posts on the topic. Also, follow our producers’ twitter feed @PrProShortcuts for Premiere shortcuts.
To learn more about our production style, you can purchase a copy of our Post-production Workflow. Readers who purchase our current Final Cut Pro and Aperture workflow automatically receive the Premiere workflow when it is released.
MediaStorm offers several online and in-person training opportunities at mediastorm.com/train.
Have you made a recent switch in your editing software? Let us know about it in the comments below.